
Welcome to the Beginner’s Guide to Restoring Antique Furniture! If you have a passion for vintage pieces and want to learn how to bring them back to life, you’ve come to the right place. This comprehensive guide is designed specifically for beginners like you, providing step-by-step instructions and expert tips for a successful antique furniture restoration project.
Whether you have inherited a family heirloom or stumbled upon a hidden gem at a thrift store, restoring antique furniture can be a rewarding and fulfilling experience. Not only will you breathe new life into these cherished pieces, but you will also gain a deeper appreciation for their craftsmanship and history.
In this guide, we will walk you through the entire restoration process, from gathering the necessary supplies to adding the final touches. You will discover how to test for lead in antique furniture paint, apply paint stripper, remove residue, sand the surfaces, and choose between natural wood or stained finish. We will also discuss the benefits of antique furniture restoration and provide valuable resources for further learning.
By following this beginner’s guide and acquiring the knowledge and skills needed, you will be well-equipped to tackle your first antique furniture restoration project. Get ready to embark on a journey of discovering the beauty and value hidden in these timeless pieces!
Key Takeaways:
- Restoring antique furniture allows you to bring new life to cherished pieces with historical significance.
- This guide provides step-by-step instructions and expert tips for beginners to successfully restore antique furniture.
- You will learn how to gather necessary supplies, test for lead in paint, apply paint stripper, remove residue, sand surfaces, and choose the perfect finish.
- Antique furniture restoration offers various benefits, including preservation of history, customization, and potential cost savings.
- Further learning resources, such as books and websites, are recommended for those interested in delving deeper into furniture restoration.
Gathering Supplies for Antique Furniture Restoration
Before diving into a restoration project, it’s important to gather all necessary supplies. Having the right tools and materials on hand will ensure a successful and smooth restoration process. Here is a list of essential items to consider:
1. Paint Stripper
Removing old paint and finishes is a crucial step in antique furniture restoration. Look for a high-quality paint stripper that is effective yet safe for the furniture’s surface. One recommended brand is Citristrip, known for its effectiveness and low toxicity.
2. Sanding Tools
Sanding is essential for achieving a smooth and even surface before applying new finishes. Invest in various grits of sandpaper or sanding blocks to efficiently remove imperfections. For larger surfaces, consider using a power sander for quicker and more consistent results.
3. Sealant
Applying a sealant after sanding will help protect the wood and enhance its appearance. Choose a sealant suitable for antique furniture, such as polyurethane or shellac. Apply it in thin, even coats for optimal results.
4. Paint or Stain
Determine whether you want to preserve the natural wood or give the furniture a fresh look with paint or stain. Opt for high-quality paint or wood stain that matches your desired finish. Apply multiple thin coats for a professional-looking result.
5. Protective Gear
Ensuring your safety during the restoration process is crucial. Wear chemical-resistant gloves to protect your hands from paint stripper and other chemicals. Eye protection such as safety goggles or glasses is also necessary to shield your eyes from any potential splashes or debris.
Taking the time to gather these necessary supplies before beginning your antique furniture restoration project will set you up for success. Having everything you need on hand will make the process more efficient and enjoyable. Now that you have your supplies ready, it’s time to move on to the next step.
Continue reading to learn how to test antique furniture paint for lead and ensure a safe restoration process.
Testing for Lead in Antique Furniture Paint
To ensure the safety of antique furniture restoration projects, it is crucial to test for lead-based paint, especially in pieces manufactured prior to 1978. Lead-based paint can pose serious health risks if ingested or inhaled, making it essential to take proper precautions. Lead test kits, such as the one from 3M™, provide a simple and effective way to determine if a piece of furniture contains lead paint.
Using a lead test kit is a straightforward process. Start by selecting an inconspicuous area on the furniture that you suspect may contain lead-based paint. Open the lead test kit and remove the swab. Rub the swab firmly on the test area, ensuring it comes into contact with the surface. Observe the swab’s color change to determine the presence of lead. If the swab turns red or pink, this indicates the presence of lead-based paint.
Testing for lead in antique furniture paint is an important step in ensuring the safety of both the restorer and future users of the furniture. By identifying and addressing lead-based paint, you can take appropriate measures to mitigate health risks and handle the restoration process accordingly.
“Testing for lead-based paint is crucial to ensure the safety of antique furniture restoration projects. By using a reliable lead test kit, like the one from 3M™, restorers can confidently determine the presence of lead in furniture paint.”
| Advantages of Lead Testing Kits for Antique Furniture | Disadvantages of Lead Testing Kits for Antique Furniture |
|---|---|
| 1. Easy to use | 1. Limited testing areas due to swab size |
| 2. Provides quick results | 2. May not detect low levels of lead |
| 3. Affordable and readily available | 3. Can only determine the presence of lead, not the exact level |
| 4. Suitable for on-site testing | 4. Requires proper disposal of used swabs |
While lead test kits offer a convenient solution for testing antique furniture paint, there are some limitations to consider. The size of the swab limits the testing area, and low levels of lead may not be detectable. Additionally, lead test kits can only determine the presence of lead, not the exact level. However, their affordability, accessibility, and ease of use make them a valuable tool for restorers.
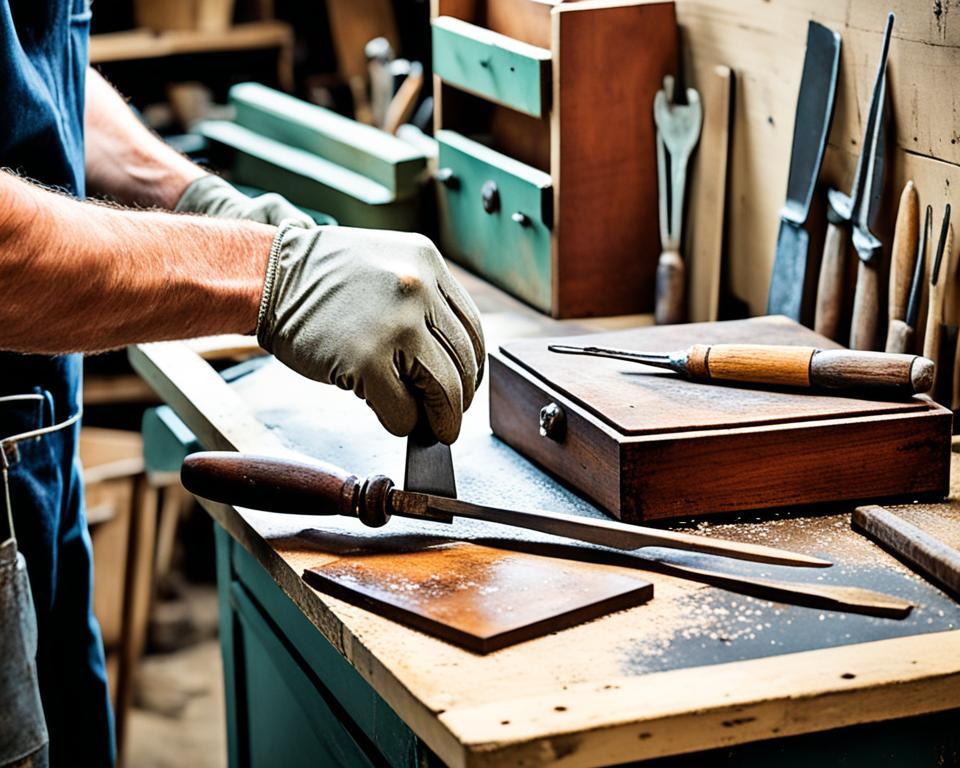
Applying Paint Stripper for Antique Furniture Restoration
When it comes to restoring antique furniture, using the right paint stripper is essential for achieving the desired results. In this section, we’ll explore the use of Citristrip, a highly recommended brand known for its effectiveness in stripping furniture. By following the proper application techniques, you can ensure a successful restoration process.
Before diving into the paint stripping process, make sure to protect your hands with chemical-resistant gloves. This will safeguard your skin from any potential irritation or damage caused by the paint stripper.
Next, it’s time to apply the Citristrip. Grab a chip brush and generously coat the surface of the furniture with the paint stripper. Ensure that you cover all areas that need stripping, as Citristrip works best when thoroughly applied. Take your time and be meticulous in this step.
To prevent the paint stripper from drying out, cover the freshly applied Citristrip with plastic wrap. This helps create a barrier that preserves the moisture and enhances the effectiveness of the product. Leave the plastic wrap in place for up to 24 hours. This allows the Citristrip to penetrate the layers of paint and break its bond with the wood, making it easier to scrape off.
Once the waiting period is over, it’s time to start removing the paint. Use a scraping tool, such as a putty knife or paint scraper, to gently lift the softened paint off the furniture. Take care to scrape in the direction of the wood grain to avoid damaging the surface.
If there are multiple layers of paint, you may need to repeat the process and apply a second coat of Citristrip. This ensures that even the stubborn layers are effectively stripped away. Remember to follow the manufacturer’s instructions and safety guidelines.
Now that you’ve successfully removed the old paint, you can proceed to the next steps in the antique furniture restoration process. Clean off any residue left by the paint stripper using mineral spirits and scrubbing pads or toothpicks for hard-to-reach areas. This prepares the furniture for the next phase of restoration.
Below is a quote from an experienced restorer, emphasizing the effectiveness of Citristrip:
“I’ve been using Citristrip for years, and it has never failed me. Its gentle formula makes it safe to use on various wood surfaces, yet it still packs a powerful punch when it comes to stripping away layers of paint. I highly recommend it for any furniture restoration project.” – Jane Thompson, Antique Furniture Restorer
Next, we’ll move on to the crucial step of removing residue from antique furniture. Be sure to check out the following section to learn how to achieve a clean surface for a pristine restoration finish.
Removing Residue from Antique Furniture
After using paint stripper for antique furniture restoration, it’s essential to address the residue that may be left behind. Cleaning off the residue not only improves the aesthetic appeal but also prepares the furniture for the next restoration steps.
To effectively remove residue from antique furniture, one of the most commonly used products is mineral spirits. Mineral spirits, also known as paint thinner, are effective in dissolving and removing stubborn residue without damaging the wood.
- Step 1: Start by applying a small amount of mineral spirits to a scrubbing pad or a toothpick for hard-to-reach areas.
- Step 2: Gently scrub the surface of the furniture using circular motions, focusing on the areas with visible residue.
- Step 3: As you clean, periodically wipe away the residue with a clean cloth or paper towel.
- Step 4: Continue this process until all residue has been removed and the surface is clean.
It’s important to exercise caution when working with mineral spirits. Make sure to work in a well-ventilated area and wear gloves to protect your skin. Additionally, follow the manufacturer’s instructions and dispose of used mineral spirits properly.
Once the residue has been successfully cleaned off, wipe down the furniture with a clean, dry cloth and allow it to dry completely before proceeding with the next steps of the restoration process.
| Pros of Using Mineral Spirits for Cleaning Residue | Cons of Using Mineral Spirits for Cleaning Residue |
|---|---|
|
|
Safety Tip
Always read and follow the safety instructions provided by the manufacturer of the mineral spirits or paint thinner. Proper ventilation and protective gear, such as gloves, are crucial when working with these chemicals.

Sanding Antique Furniture for a Smooth Finish
Once the paint stripper has been successfully removed from the antique furniture, the next step in the restoration process is to sand the surfaces to achieve a smooth finish. Sanding is crucial for removing any remaining paint or residue and preparing the furniture for the final touches.
Sanding antique furniture can be done using either sandpaper or a power sander, depending on the size and complexity of the piece. For larger, flat surfaces such as table tops or cabinet doors, a power sander is recommended as it can save time and effort. However, for intricate areas or curved surfaces, it’s best to use sandpaper or sanding blocks to ensure precision and control.
When sanding, it’s important to always follow the grain of the wood. Sanding against the grain can result in scratches and uneven surfaces. Start with a coarse-grit sandpaper or sanding disc to remove any roughness or imperfections. Then, gradually move to finer-grit sandpaper to achieve a smoother finish.
Note: Remember to wear protective gear such as goggles and a mask to prevent inhalation of dust particles.
Removing Dust
After sanding, it’s crucial to remove any dust or debris from the furniture before proceeding with the next steps. This can be done using tack cloths or a vacuum cleaner with a brush attachment. Ensuring a clean surface will help the final finish to adhere properly.
Sanding Grit Guide
| Grit | Description | Best Used for |
|---|---|---|
| Coarse (40-60) | Removes roughness, paint, and stubborn stains | Initial sanding, removing imperfections |
| Medium (80-120) | Smooths surfaces, evens out rough areas | Preparing the surface for finer sanding |
| Fine (150-180) | Refines surfaces, removes scratches left by coarser grits | Final sanding before application of finish |
| Super Fine (220-240) | Produces an ultra-smooth surface | Final touch-up, readying surface for staining or sealing |
Sanding antique furniture is a critical step in achieving a professional-looking final result. It helps to create a smooth and polished surface that enhances the overall aesthetics of the piece. Once the sanding process is complete, the furniture is ready for the next steps in the restoration process, whether that involves staining, sealing, or applying a protective finish.
Choosing Between Natural Wood or Stained Finish
When it comes to restoring antique furniture, one important decision to make is whether to preserve the natural beauty of the wood or enhance it with a stained finish. Each option offers its own unique charm and benefits, catering to different preferences and styles.
Natural Wood Finish
A natural wood finish showcases the inherent character and grain patterns of the antique furniture. This option is ideal for those who appreciate the warmth and authenticity of the wood’s natural color. With a natural finish, the furniture exudes a timeless elegance, allowing the craftsmanship to take center stage.
“Preserving the natural wood finish is a great way to honor the history and craftsmanship of antique furniture.” – [Insert Expert Name]
To achieve a natural wood finish, you can follow these steps:
- Clean the surface of the furniture using a mild wood cleaner.
- Apply a clear wood conditioner to enhance the wood’s natural color.
- Seal the wood with a clear, water-based polyurethane to protect it from moisture and wear.
Stained Finish
On the other hand, staining antique furniture allows you to customize the color and create a uniform appearance. A stain can help even out inconsistencies in the wood’s color, making the furniture appear more cohesive. This option is particularly beneficial for pieces with noticeable color variations or to match the furniture with other décor elements in the room.
“Adding a stained finish to antique furniture adds depth and character, while still honoring its vintage appeal.” – [Insert Expert Name]
Here’s a simple process for staining antique furniture:
- Choose a stain color that complements the furniture and fits your aesthetic.
- Using a rag or brush, apply a light coat of stain, ensuring even coverage.
- Allow the stain to penetrate the wood for the desired amount of time.
- Wipe off any excess stain and let the furniture dry completely.
- Apply water-based polyurethane to protect the stained surface and enhance its durability.
“Staining antique furniture provides an opportunity to breathe new life into cherished pieces, while still honoring their history.” – [Insert Expert Name]
Ultimately, the decision between a natural wood finish and a stained finish comes down to personal preference and the desired aesthetic for the antique furniture. Whether you choose to showcase the natural beauty of the wood or add a touch of color, restoring antique furniture allows you to preserve its history and enjoy its timeless appeal.
| Option | Pros | Cons |
|---|---|---|
| Natural Wood Finish |
|
|
| Stained Finish |
|
|
Adding the Final Touches to Antique Furniture
After completing the restoration process, it’s time to add the finishing touches that will truly elevate the look of your antique furniture. By carefully selecting and incorporating antique furniture pulls and other decorative elements, you can enhance the overall aesthetic and create a cohesive vintage style. These final details will contribute to the polished and finished appearance of the piece.
Antique furniture pulls are an essential component when it comes to adding character and charm to your restored piece. They not only serve a functional purpose but also act as ornamental accents. Consider using antique brass pulls to complement the traditional style of your furniture. These pulls often feature intricate designs and intricate detailing, showcasing the craftsmanship of a bygone era.
When choosing antique furniture pulls, pay attention to the size and design. Opt for pulls that are proportionate to the piece and aligned with its overall style. This will ensure a harmonious and visually pleasing result. Antique shops, online marketplaces, and specialty hardware stores are great sources for finding a wide selection of antique pulls to suit your needs.
In addition to pulls, consider incorporating other decorative elements such as escutcheons and keyhole covers. These small details can make a significant difference in the overall presentation of your antique furniture. Choose pieces that match the style and era of your furniture to maintain authenticity.
To inspire you, here’s an image of a beautifully restored antique cabinet with carefully selected antique furniture pulls:
Remember, the goal is to create a cohesive vintage look that highlights the beauty and history of your restored piece. By adding the perfect antique furniture pulls and other decorative elements, you can achieve a stunning finished result that showcases your craftsmanship and attention to detail.
Benefits and Advantages of Restoring Antique Furniture
Restoring antique furniture provides a multitude of benefits and advantages that make it a worthwhile endeavor for enthusiasts and beginners alike. Whether you’re preserving history, customizing a cherished piece, or looking to save money, the rewards of DIY furniture restoration are truly exceptional.
Preservation of History
When you embark on the journey of restoring antique furniture, you are not only enhancing the beauty of a particular piece but also preserving its historical significance. Each restored furniture item represents a unique story and serves as a tangible link to the past. By carefully revitalizing these treasures, you contribute to the preservation of our collective heritage.
Customization and Personalization
One of the key advantages of antique furniture restoration is the opportunity to customize and personalize the piece according to your taste and style. Whether it’s refinishing the wood in a different shade, adding decorative elements, or reupholstering with a fabric of your choice, you have the freedom to create a one-of-a-kind masterpiece that reflects your individuality.
Potential Cost Savings
Restoring antique furniture can be a cost-effective alternative to purchasing new pieces. Rather than investing in brand-new furniture with often hefty price tags, you can acquire antique pieces at a lower cost and transform them into stunning works of art through restoration. With careful planning and a DIY approach, you can achieve remarkable results without breaking the bank.
Satisfaction and Sense of Achievement
“Restoring antique furniture allows individuals to unleash their creativity, learn new skills, and experience the satisfaction of transforming a neglected piece into a cherished treasure.”
The process of restoring antique furniture is not only a rewarding creative endeavor but also an opportunity to acquire new skills and knowledge. As beginners undertake restoration projects, they learn techniques such as stripping, sanding, staining, and finishing, which can be applied to future projects. The sense of achievement that comes with successfully completing a restoration project is truly fulfilling and can inspire a lifelong passion for furniture restoration.

| Advantages of Restoring Antique Furniture | Benefits of DIY Furniture Restoration |
|---|---|
| Preservation of history | Customization and personalization |
| Potential cost savings | Satisfaction and sense of achievement |
Tips for Successful Antique Furniture Restoration
If you’re a beginner embarking on an antique furniture restoration project, here are some essential tips and techniques to ensure a successful outcome. These beginner-friendly furniture restoration techniques will help you navigate the process with confidence and achieve satisfying results.
1. Patience is Key
Antique furniture restoration requires patience and a methodical approach. Take your time to carefully assess the condition of the piece, plan your restoration process, and execute each step with precision. Rushing through the restoration can lead to mistakes and unsatisfactory results.
2. Research and Learn
Before diving into your restoration project, take the time to research and learn about the specific type of antique furniture you are working on. Familiarize yourself with the techniques, materials, and finishes commonly used in that era. This knowledge will help you make informed decisions throughout the restoration process.
3. Clean and Prep the Surface
Ensure that the surface of the furniture is clean and free from dirt, grime, and old finishes before starting any restoration work. Use gentle cleaning methods and avoid harsh chemicals that may damage the wood. A clean surface will provide a solid foundation for the restoration process.
4. Practice on Small Sections
If you’re new to furniture restoration, it’s a good idea to practice your techniques on small, inconspicuous sections of the furniture before tackling the entire piece. This allows you to refine your skills and gain confidence in your abilities before moving on to more visible areas.
5. Take Before and After Photos
Documenting your restoration journey with before and after photos is not only satisfying but also serves as a valuable reference for future projects. It allows you to track your progress, compare different techniques, and showcase your accomplishments.
6. Protect the Original Hardware
If the antique furniture has original hardware, such as handles or knobs, take extra care to protect and preserve them during the restoration process. Remove the hardware before stripping or refinishing and clean them separately. This ensures that the hardware retains its original charm and adds to the authenticity of the piece.
7. Seek Professional Advice When Needed
Don’t hesitate to seek professional advice or assistance if you encounter any challenges during the restoration process. There are experts in the field who can provide valuable guidance and help you overcome obstacles that may arise.
| Tips for Successful Antique Furniture Restoration |
|---|
| 1. Patience is Key |
| 2. Research and Learn |
| 3. Clean and Prep the Surface |
| 4. Practice on Small Sections |
| 5. Take Before and After Photos |
| 6. Protect the Original Hardware |
| 7. Seek Professional Advice When Needed |
By following these tips and incorporating beginner-friendly furniture restoration techniques, you’ll be well-equipped to restore antique furniture with confidence and achieve beautiful results that will be enjoyed for years to come.
Resources for Further Learning on Furniture Restoration
For those looking to delve deeper into the world of furniture restoration, there are several recommended resources available. Whether you prefer learning from books or exploring online platforms, these resources offer comprehensive guides and inspiration to enhance your restoration skills. Here are some valuable sources to consider:
Books on Furniture Restoration
“Furniture Restoration Workshop” by Kevin Jan Bonner
“Furniture Restoration and Repair for Beginners” by Kevin Jan Bonner
These books provide detailed instructions, tips, and techniques for restoring antique furniture. From understanding different woodworking tools to mastering restoration processes, you’ll find comprehensive guidance to tackle your next project successfully.
Websites for Furniture Restoration
- CentsationalGirl: This popular website offers a wealth of information and inspiration for furniture restoration enthusiasts. Browse through their articles and tutorials to find expert advice, step-by-step guides, and creative ideas.
- Design*Sponge: Known for its design-focused content, Design*Sponge also provides valuable resources on furniture restoration. Explore their articles and DIY projects to learn more about techniques, materials, and design elements that can elevate your restoration projects.
By referring to these books and websites, you can enhance your knowledge, gain new ideas, and improve your skills in the art of furniture restoration. Remember, practice and continuous learning are key to becoming a proficient restorer.
| Resource | Description |
|---|---|
| “Furniture Restoration Workshop” by Kevin Jan Bonner | A comprehensive guidebook that covers various restoration techniques, tools, and materials. |
| “Furniture Restoration and Repair for Beginners” by Kevin Jan Bonner | An excellent resource for beginners, providing step-by-step instructions and tips for restoring and repairing furniture. |
| CentsationalGirl | An online platform offering articles and tutorials on furniture restoration, showcasing inspiring project ideas and providing insights on techniques and materials. |
| Design*Sponge | A design-focused website that features articles, DIY projects, and resources on furniture restoration, offering ideas, tips, and design inspirations. |
Conclusion
In conclusion, this beginner’s guide to restoring antique furniture provides a comprehensive step-by-step process for beginners to successfully restore cherished pieces. By following the outlined techniques and utilizing the available resources, individuals can bring new life to old furniture and preserve its historical value.
Throughout this guide, we have discussed the importance of gathering the necessary supplies, testing for lead in paint, applying paint stripper, removing residue, sanding for a smooth finish, and choosing between a natural wood or stained finish. We have also explored adding the final touches and discussed the benefits of restoring antique furniture.
Restoring antique furniture not only allows beginners to unleash their creativity and customize their pieces but also offers potential cost savings compared to purchasing new furniture. By taking the time to restore these historical treasures, beginners can create unique and personal pieces that will be cherished for years to come.
FAQ
What are the essential supplies needed for antique furniture restoration?
The necessary supplies include paint stripper, sanding tools, sealant, and paint or stain. It’s also important to have protective gear such as gloves and eyewear.
How can I test antique furniture for lead-based paint?
Use lead test kits, like the one from 3M™, to determine if the furniture contains lead paint. Rub the swab on the test area and observe the color change to detect the presence of lead.
Which brand of paint stripper is recommended for antique furniture restoration?
Citristrip is a recommended brand of paint stripper for antique furniture restoration.
How should I apply paint stripper to antique furniture?
Apply the Citristrip generously using a chip brush, cover with plastic wrap, and leave it on for up to 24 hours before scraping off.
How do I remove residue from antique furniture after using paint stripper?
Use mineral spirits and scrubbing pads or toothpicks for hard-to-reach areas. Wipe down the furniture and allow it to dry before proceeding.
What is the recommended method of sanding antique furniture?
Use power sanders for larger, flat surfaces and sandpaper or sanding blocks for smaller areas. Sand with the grain of the wood and remove dust using tack cloths or a shop vac.
Should I leave the antique furniture in its natural state or apply a stain?
It depends on your preference. If you want to even out the wood’s color, you can apply a light coat of stain using a rag. Follow it up with water-based polyurethane for protection.
How can I enhance the look of my restored antique furniture?
Consider adding antique brass pulls or other decorative elements to enhance the overall appearance of the furniture.
What are the benefits of restoring antique furniture?
Restoring antique furniture helps preserve history, allows for customization, and can result in cost savings compared to purchasing new furniture.
Do you have any tips for successful antique furniture restoration?
Yes! Remember to be patient, plan carefully, and pay attention to detail throughout the restoration process.
Where can I find additional resources for learning about furniture restoration?
Books such as “Furniture Restoration Workshop” and “Furniture Restoration and Repair for Beginners” are recommended. Online platforms like CentsationalGirl and Design*Sponge offer inspiration and tutorials.