
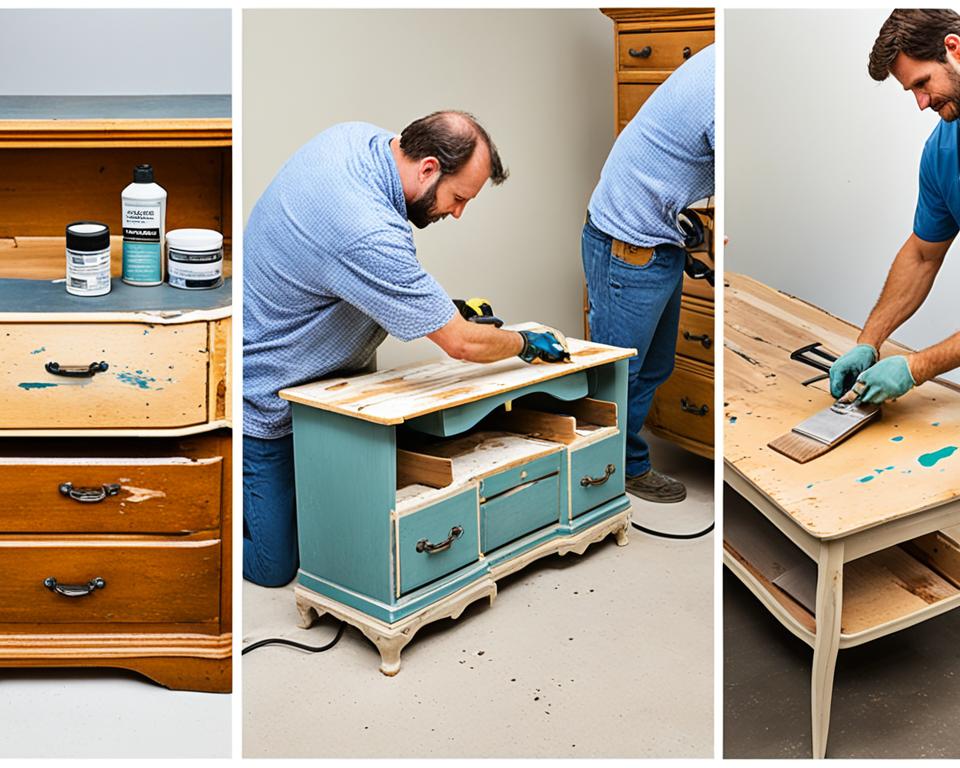
Furniture refinishing can be a rewarding DIY project that allows you to transform old pieces into stunning highlights in your home. Whether you’re a beginner or have some experience, these expert tips will help you revitalize your furniture with ease.
When it comes to furniture restoration techniques, there are a few key things to keep in mind. First, consider the type of finish you want to achieve. Whether you prefer a natural wood look or a bold painted finish, the choice is yours. With furniture refinishing, you have the creative freedom to customize your pieces to suit your personal style.
Another important factor to consider is the condition of the furniture you plan to refinish. Select pieces that are made of solid wood and are in good condition. Look for furniture with dovetail joints, solid wood construction, and wood veneer glued to solid wood. Starting with quality furniture will ensure better results in the refinishing process.
Lastly, be prepared with the right tools and materials. This includes proper safety gear such as gloves, goggles, and a well-ventilated workspace. Additionally, invest in high-quality stripping products and finishes to achieve professional-like results.
Key Takeaways:
- Choose furniture made of solid wood for better refinishing results.
- Research safer alternatives to chemical strippers for a healthier refinishing experience.
- Use liquid-based stripping gels for hard-to-reach areas.
- Select clear strippers for better visibility of the stripping process.
- Allow the stripper to sit for optimal results in removing old finishes.
Understanding the Dangers of Chemical Strippers
When it comes to furniture refinishing, using chemical strippers can be an effective way to remove old finishes and prepare the surface for a fresh look. However, it’s important to be aware of the potential dangers associated with these products. Many chemical strippers contain harmful substances that can pose health risks if not used properly.
Exposure to certain chemicals found in these strippers, such as methylene chloride and N-methyl-2-pyrrolidone (NMP), can lead to various health issues. Inhalation or skin contact with these chemicals can cause irritation, allergic reactions, respiratory problems, and even more serious health conditions.
To ensure safe furniture refinishing, it’s crucial to research and choose safer alternatives for removing old finishes. One such product is the QCS vintage finish remover. This stripping gel is free from harmful chemicals like NMP, making it a safer option for both you and the environment.
“Using QCS vintage finish remover has been a game-changer in my furniture restoration projects. Not only does it effectively strip away the old finishes, but I also feel confident knowing that I’m using a product that prioritizes safety.” – Jane Roberts, DIY enthusiast
This clear and non-toxic formulation allows for easy application and provides effective results without compromising your safety. By opting for a safer alternative like QCS, you can enjoy the process of furniture refinishing while minimizing the risks associated with chemical strippers.
Chemical Stripper Safety Tips
When using any chemical stripper, it’s important to follow safety guidelines to protect yourself and those around you:
- Always work in a well-ventilated area to minimize inhalation of fumes. Open windows, use fans, or work outside whenever possible.
- Wear protective gear, including gloves, safety goggles, and a respirator mask, to shield yourself from potential skin and respiratory irritation.
- Read and follow the instructions provided by the manufacturer carefully. Each product may have specific safety precautions and application guidelines.
- If skin contact occurs, wash the affected area immediately with soap and water. In case of ingestion or serious irritation, seek medical attention.
By being well-informed about the dangers associated with chemical strippers and taking the necessary precautions, you can safely enjoy the rewarding process of furniture refinishing.
| Chemical Stripper | Inhalation Risks | Skin Contact Risks | Environmentally Friendly |
|---|---|---|---|
| Traditional Stripper X | Elevated risk of respiratory problems | Possible skin irritation and allergic reactions | Contains harmful chemicals |
| QCS Vintage Finish Remover | Minimized inhalation risks | Gentle on the skin, reduced irritation | Free from harmful chemicals |
Selecting Quality Furniture for Refinishing
When it comes to refinishing furniture, selecting the right pieces to work on is crucial for achieving outstanding results. Quality furniture forms a solid foundation for the refinishing process and ensures that your efforts will pay off. Here are some key factors to consider when choosing furniture for restoration:
- Material: Opt for pieces made of solid wood. This type of furniture tends to be more durable and provides a better surface for refinishing compared to particleboard or laminate.
- Condition: Look for furniture that is in good shape overall. While refinishing can address minor imperfections, selecting pieces that require minimal repairs will save you time and effort.
- Joints: Check for dovetail joints, which indicate quality craftsmanship. These interlocking joints are stronger and more durable than other types of joinery, providing stability to the furniture.
- Construction: Ensure that the furniture has a solid wood construction rather than being composed of veneers or plywood. Solid wood is easier to work with during the refinishing process and allows for better results.
- Veneer: If the furniture has a wood veneer, make sure it is securely glued to the solid wood underneath. Loose or damaged veneer can be challenging to repair and may affect the final outcome.
By selecting quality furniture for refinishing, you lay the groundwork for a successful restoration project. The right materials and structure contribute to easier refinishing, better durability, and a more refined end result.
Having identified the key considerations for choosing furniture to restore, let’s move on to the next section to explore effective techniques for using liquid-based strippers in furniture refinishing.
Using Liquid-Based Strippers for Nooks and Crannies
When it comes to refinishing furniture, tackling those hard-to-reach areas and intricate details can be a challenge. Traditional stripping gels often struggle to penetrate tight spaces, leaving behind stubborn residue. However, there’s a solution that can make the process much easier and more efficient: liquid-based stripping gel.
One highly recommended option is the QCS liquid-based stripping gel. This innovative product is specifically designed to remove old finishes from even the most hard-to-reach areas without causing buildup or leaving excess residue. Its liquid consistency allows it to seep into tight spaces, ensuring thorough coverage and effective removal of the finish.
Removing Finish from Tight Spaces
The QCS liquid-based stripping gel’s ability to reach into nooks and crannies makes it a game-changer for furniture refinishing. Whether it’s intricate carvings, grooves, or corners, this stripping gel can effortlessly penetrate those tight spaces, ensuring that every inch of the furniture’s surface is adequately stripped.
Whether you’re working on an antique dresser with ornate details or a modern piece with intricate inlays, the liquid-based stripping gel provides the precision you need to achieve a flawless finish.
With QCS, you no longer have to worry about using tedious methods or ineffective products to remove finish from these hard-to-reach areas. The liquid-based formula simplifies the process and helps you achieve professional results with minimal effort.
Efficient Furniture Refinishing Techniques
Using the QCS liquid-based stripping gel is not only effective for removing finish from tight spaces, but it also simplifies the overall furniture refinishing process. Its unique formulation ensures easy application and quick removal, saving you valuable time and effort.
By incorporating this innovative stripping gel into your refinishing routine, you can streamline the process, complete projects faster, and achieve exceptional results.
Whether you’re a professional or a DIY enthusiast, the QCS liquid-based stripping gel can revolutionize your furniture refinishing techniques. Its liquid consistency allows for precise application, ensuring that every nook and cranny is adequately addressed. Additionally, it drips off effortlessly, preventing buildup and making clean-up a breeze.
Next time you embark on a furniture refinishing project, consider using a liquid-based stripping gel like QCS to simplify the process and achieve impeccable results. Its ability to remove finish from tight spaces and its time-saving features make it an invaluable tool for any refinishing project.
Choosing Clear Strippers for Visibility
When it comes to furniture refinishing, one of the key factors for a successful project is having good visibility during the stripping process. This is where choosing a clear furniture stripper can make all the difference.
Some furniture strippers on the market today contain added color, which can make it challenging to see how the product is working. The opaque nature of these strippers can hinder your ability to monitor the progress and effectiveness of the stripping process.
By opting for a clear stripper, you can have better visibility of the stripping process and ensure that you don’t miss any areas or overlook any stubborn finishes. Being able to see the wood underneath will give you a clearer understanding of whether additional applications are necessary.
Additionally, clear strippers allow you to identify any imperfections in the wood that may need special attention before refinishing. This will help you achieve a smoother and more professional end result.
Choosing a clear stripper enables you to have a clear window into the stripping process and empowers you to make informed decisions at every step.
One highly recommended option is the QCS clear furniture stripper. It has a transparent formula that provides excellent visibility and allows you to closely monitor the progress of the stripping process. With QCS, you can confidently work on your furniture, knowing that you have chosen a product that offers both effectiveness and visibility.
Remember, the right choice can make all the difference. So, when it comes to furniture refinishing, opt for a clear stripper to maximize visibility and achieve exceptional results.
Avoid Unnecessary Sanding After Stripping
When it comes to furniture refinishing, many people believe that sanding is an unavoidable step after stripping off the old finish. However, this is a common misconception that can lead to unnecessary removal of wood and extra work. By understanding the process and allowing the stripper to do its job effectively, you can minimize the amount of sanding required and preserve the wood for future refinishing projects.
Stripping furniture involves using chemical or liquid-based strippers to remove the old finish from the surface. These products work by breaking down the existing layers of stain or paint, making it easier to remove. It is essential to choose a quality stripper that is specifically designed for the type of finish you are removing to ensure effective results.
Once you have applied the stripper to the furniture, it is important to follow the manufacturer’s instructions regarding the recommended waiting time. This allows the stripper to fully penetrate the old finish and break it down effectively. By giving the stripper enough time to work, you can avoid excessive sanding by allowing the product to do the majority of the work for you.
After the designated waiting period, you can start removing the old finish using a scraper or steel wool. Take your time and be gentle to avoid damaging the wood surface. You will notice that the finish comes off easily, requiring minimal sanding to achieve a smooth and even result.
Minimizing sanding not only saves time and effort but also helps preserve the integrity of the wood. Excessive sanding can remove too much of the wood’s surface, leading to a loss of detail and potentially weakening the structure of the furniture. By relying on the stripping product to break down the old finish, you can preserve the natural beauty of the wood and ensure a successful refinishing project.
Benefits of minimizing sanding after stripping:
- Preserves the wood: By avoiding excessive sanding, you can retain the natural characteristics and quality of the wood. This is especially important for antique or valuable pieces that may have unique features or wood grain patterns.
- Time-saving: Sanding can be a labor-intensive process. By minimizing sanding after stripping, you can expedite the refinishing process and achieve excellent results in less time.
- Less dust and mess: Sanding generates a significant amount of dust, which can be messy and difficult to clean up. Minimizing sanding reduces the amount of dust produced, making the refinishing process cleaner and more manageable.
Remember, every refinishing project is unique, and the extent of sanding required may vary depending on the condition and type of furniture you’re working with. However, by following proper stripping techniques and allowing the stripper to effectively break down the old finish, you can minimize sanding and achieve outstanding results in your furniture restoration journey.
Allowing the Stripper to Work for Better Results
Patience is key when using a furniture stripper. Allowing the stripper to sit on the surface for an extended period of time, as recommended by the product’s instructions, will yield better results. This gives the product more time to break down the layers of stain and finish, making the removal process easier.
The process of furniture restoration involves carefully stripping away the old stain and finish to reveal the natural beauty of the wood. To maximize the effectiveness of the stripping agent, it is important to let it sit on the surface for a sufficient amount of time. This allows the stripper to penetrate the layers of the old finish and effectively break it down.
By letting the stripper sit, you are giving it the opportunity to do its job properly. It needs time to dissolve the layers of stain and finish, making them easier to remove. The longer the stripper sits, the more effective it will be in loosening the old finish and preparing the surface for refinishing.
Each furniture stripper product will have specific instructions on how long it should be left on the surface. It is essential to follow these instructions carefully to achieve the best results. Some strippers may require a few minutes, while others may need several hours. By adhering to the recommended wait time, you can ensure that you are maximizing the effectiveness of the stripper.
In addition to letting the stripper sit for the recommended time, it is also important to protect the surface from drying out. Covering the stripper with plastic wrap or a damp cloth can help prevent it from evaporating too quickly. This will allow the stripper to work longer and more effectively.
Once the recommended wait time has elapsed, you can proceed with the removal process. Use a scraper or a soft-bristle brush to gently remove the softened finish. Be sure to follow the manufacturer’s instructions and take proper safety precautions when handling the stripper and the removed finish.
By allowing the stripper to work for an adequate amount of time, you can achieve better results in your furniture restoration project. Letting the product sit and penetrate the layers of the old finish will maximize its effectiveness and make the removal process easier. It’s a simple step that can greatly contribute to the success of your furniture refinishing endeavor.
Remember to always prioritize safety when working with furniture strippers. Follow the manufacturer’s instructions, use proper protective gear, and work in a well-ventilated area to minimize exposure to fumes.

Cleaning and Preparing the Wood Surface
Before refinishing your furniture, it is crucial to start with a clean and pristine wood surface. Properly cleaning and preparing the wood ensures that the new finish adheres well and creates a flawless result.
To begin, gather the following materials:
- Dish soap
- Warm water
- Clean cloth or sponge
Follow these simple steps to effectively clean and prepare the wood surface:
- Mix a solution of dish soap and warm water in a bucket or container. Using gentle dish soap helps break down dirt and grime without being too harsh on the wood.
- Dip a clean cloth or sponge into the soapy solution and wring it out to remove excess water.
- Gently scrub the wood surface in a circular motion, paying attention to any areas with visible dirt or sticky substances.
- Rinse the cloth or sponge in clean water and continue wiping the surface to remove any soap residue.
- Finally, use a dry cloth or paper towel to thoroughly dry the wood surface. Removing all moisture ensures that the new finish adheres properly.
By following these steps, you ensure that your furniture is free from any dirt, grime, or sticky substances that could interfere with the refinishing process. This surface preparation sets the stage for a smooth and successful restoration of your furniture.
Quote:
“A clean wood surface is the foundation for a flawless furniture refinishing project. Taking the time to properly clean and prepare the wood ensures better adhesion and professional-like results.”
Now that you have a clean and prepped wood surface, you’re ready to apply the new finish and bring your furniture back to life. The next section will guide you through choosing the right finish for your furniture.
Choosing the Right Finish for Your Furniture
When it comes to refinishing your furniture, selecting the right finish is crucial to achieving the desired outcome. Several factors, such as the frequency of use, the desired appearance, and the type of wood, should be taken into account. Consider the following options:
Oil Finishes
An oil finish, such as tung oil or Danish oil, penetrates the wood to enhance its natural beauty and provide a protective layer. These finishes offer a warm, rich look and are easy to apply. They are ideal for furniture that will be frequently used, as they can be easily maintained and repaired if needed.
Lacquer
Lacquer finishes provide a durable and glossy surface that enhances the beauty of the wood grain. This type of finish dries quickly and can be easily repaired or touched up. Lacquer finishes are often used on high-end furniture and provide a sleek and polished appearance.
Polyurethane
Polyurethane finishes are known for their excellent durability and resistance to scratches and stains. They come in both oil-based and water-based formulations, offering different levels of sheen. Water-based polyurethane finishes are more environmentally friendly and have a quicker drying time, making them a popular choice for DIY projects.
Choosing the right finish is essential to protect and enhance your furniture. Whether you prefer the natural look of oil finishes, the glossy appearance of lacquer, or the durability of polyurethane, consider your specific needs and preferences when making your selection.
Additionally, it’s important to follow the manufacturer’s instructions for each finish and apply multiple coats to ensure proper coverage and protection. Remember to allow ample drying time between coats for the best results.

By carefully selecting the right finish for your furniture, you can create a beautiful and long-lasting result that will enhance the aesthetic appeal of your home.
Applying Stain or Paint for a New Look
Once the old finish has been removed and the wood surface has been prepared, it’s time to apply a fresh coat of stain or paint to give your furniture a brand new look. Whether you prefer the natural beauty of stained wood or the bold statement of painted furniture, this step allows you to express your personal style and transform your pieces.
When applying stain or paint, it’s important to ensure an even and smooth application. Use a paint brush or roller, depending on the size and texture of the furniture, to apply the chosen product. Start from one end and work your way to the other, following the grain of the wood for a seamless finish.
Allow the first coat to dry completely before deciding if additional coats are necessary. Depending on the desired level of color or coverage, multiple coats may be required. Take your time with each coat and ensure even coverage to achieve professional-looking results.
For a stained finish, consider using a wood conditioner before applying the stain. This helps the wood absorb the stain more evenly and prevents blotchiness. Apply the stain with long, even strokes in the direction of the grain, taking care to avoid drips or pooling.
If you’re opting for a painted finish, choose a high-quality furniture paint that is durable and provides a smooth finish. Apply the paint evenly, allowing each coat to dry before adding the next. Sand lightly between coats for a flawless result.
Remember to follow any specific instructions provided by the manufacturer of the stain or paint you choose. This will ensure optimal results and help you achieve the desired look for your refinished furniture.
Comparing Stain and Paint for Furniture Refinishing
| Stain | Paint | |
|---|---|---|
| Application Method | Brush or rag | Brush or roller |
| Appearance | Enhances natural wood grain | Opaque; offers a variety of color options |
| Protection | Semi-protective; requires a topcoat for added durability | Protective; can act as a barrier against moisture and wear |
| Time Required | Quick application, dries relatively fast | Multiple coats and drying time required |
| Maintenance | Periodical reapplication may be necessary over time | Easily touch-up and repaint as needed |
Conclusion
Furniture refinishing is a rewarding and creative journey that allows you to revive and transform old pieces into beautiful, personalized treasures for your home. By following the expert tips and techniques shared throughout this guide, you can achieve professional-like results and breathe new life into your furniture.
To ensure a successful refinishing project, it is crucial to choose safe stripping products like QCS vintage finish remover, which eliminates the risks associated with harmful chemicals. Additionally, selecting quality furniture with solid wood construction and paying attention to intricate details will set a solid foundation for the refinishing process.
Proper preparation, including cleaning the wood surface and allowing the stripper to work its magic, is key to achieving excellent results. Take your time and have patience during the process, allowing the stripper to sit as recommended. This will effectively break down the layers of stain and finish, ultimately making removal easier and ensuring a smooth surface.
Finally, selecting the right finish for your furniture, whether it’s an oil finish, lacquer, or polyurethane, will add the perfect touch to your refurbished piece. With these tips and techniques in mind, you’re well-equipped to embark on your furniture refinishing journey. Get ready to unleash your creativity and enjoy the satisfaction of transforming old furniture into stunning, personalized masterpieces for your home!
FAQ
What are some furniture refinishing tips?
Here are some expert tips for furniture refinishing:
– Choose safer options for removing old finishes, such as QCS vintage finish remover.
– Select furniture made of solid wood and in good condition.
– Use liquid-based stripping gel for furniture with intricate details or tight spaces.
– Choose a clear stripper for better visibility of the stripping process.
– Minimize sanding after stripping to preserve the wood.
– Allow the stripper to sit on the surface for an extended time for better results.
– Thoroughly clean the wood surface before refinishing.
– Consider factors such as frequency of use and desired appearance when choosing a finish.
– Apply a new coat of stain or paint evenly and let it dry completely.
Are chemical strippers safe to use for furniture refinishing?
Many chemical strippers used in furniture refinishing can pose health risks and contain harmful substances. It’s important to research and choose safer options for removing old finishes, such as QCS vintage finish remover. This product is free from harmful chemicals like NMP and provides a safer alternative for stripping furniture.
How do I choose quality furniture for refinishing?
When selecting furniture to refinish, it’s important to choose pieces that are made of solid wood and in good condition. Look for furniture with dovetail joints, solid wood construction, and wood veneer glued to solid wood. Starting with quality furniture will ensure better results in the refinishing process.
What is the advantage of using liquid-based stripping gel?
Traditional stripping gels can be difficult to use on furniture with intricate details or tight spaces. Using a liquid-based stripping gel like QCS allows the product to get into those hard-to-reach areas and drip off easily without building up. This helps to effectively remove old finishes without leaving excess residue.
Should I choose a clear or colored stripper for furniture refinishing?
Some furniture strippers have added color, which can make it difficult to see how the product is working. Choosing a clear stripper allows you to have better visibility of the stripping process and ensures that you can monitor the progress and effectiveness of the product.
Is sanding necessary after stripping furniture?
It is a common misconception that sanding is necessary after stripping furniture. However, by allowing the stripper to do its job and properly break down the old finish, you may be able to minimize the amount of sanding required. This saves the wood from unnecessary removal and preserves it for future refinishing projects.
How long should the stripper sit on the furniture’s surface?
Patience is key when using a furniture stripper. Allowing the stripper to sit on the surface for an extended period of time, as recommended by the product’s instructions, will yield better results. This gives the product more time to break down the layers of stain and finish, making the removal process easier.
How should I clean and prepare the wood surface before refinishing?
Before refinishing, it is important to thoroughly clean the wood surface to remove any dirt, grime, or sticky substances. Use a mixture of dish soap and warm water to clean the surface, followed by rinsing and drying. This ensures a clean and smooth base for applying the new finish.
What factors should I consider when choosing a finish for my furniture?
The choice of finish for your furniture depends on factors such as the frequency of use, the desired appearance, and the type of wood. Consider options such as oil finishes, lacquer, or polyurethane based on these factors. Each finish has its own benefits and considerations that should be taken into account.
How do I apply stain or paint for a new look on my furniture?
Once the old finish has been removed and the wood surface has been prepared, you can apply a new coat of stain or paint to achieve the desired look. Use a paint brush or roller to apply the chosen product evenly, allowing it to dry completely before assessing if additional coats are necessary.
How can I achieve professional-like results in furniture refinishing?
Furniture refinishing can be a fulfilling and creative endeavor that allows you to breathe new life into old pieces. By following these tips and techniques, you can achieve professional-like results and transform your furniture into beautiful, personalized pieces for your home. Remember to choose safe stripping products, select quality furniture, and take your time to properly prepare and finish the wood surface. Happy refinishing!